Thursday, March 31, 2011

Banana Bread


Some people have it in their minds that banana bread is some kind of dumping ground for unused, overripe bananas, like the threat of wasted produce is what drives them to get in the kitchen and bake.

"I just don't know what I'll do with all these leftover bananas, guess I have to make bread."

And while my struggle for dominance in the produce aisle is far from over, I, like anyone else with an oversize sweet tooth, have learned something important.

Bananas are not the boss of me.

You see, I no longer let my rotting fruit strong-arm me into anything. I have taken a stand. When I go to the grocery store I assertively buy bananas for one reason and one reason alone. And that is banana freaking bread.

Even if that means slapping a half-eaten banana from a loved one's hand and screaming, "I need those!", I remain vigilant and ready to defend. Sorry, Nathan.

Bottom line, banana bread is not happenstance, it is a treat. A delicious, creamy, on-purpose treat that should be honored as such. That said, there's no need to get gluttonous about it. Have your sweets and mind your waistline, folks. This here's the healthiest and most decadent banana bread you'll ever taste. So don't worry if you eat half a loaf. Like we did immediately after this picture was taken.

Banana Bread
  • 2 cups whole wheat flour
  • 1 cup almonds, coarsely chopped
  • 3/4 teaspoon baking soda
  • 1/2 teaspoon salt
  • 4 large, overripe bananas, mashed well
  • 1/2 cup agave syrup
  • 1/4 cup nonfat plain greek yogurt
  • 2 large eggs
  • 6 tablespoons unsweetened applesauce
  • 1-2 teaspoons pure vanilla extract

Preheat oven to 350 degrees F. Wipe a 9 by 5 inch loaf pan with olive oil and dust with flour.

In a large mixing bowl, whisk together the flour, almonds, baking soda, and salt. Set aside.

In a medium bowl, combine the mashed bananas, agave syrup, yogurt, eggs, applesauce, and vanilla extract. Fold the wet ingredients into the dry, and mix until just combined. Don't mind the lumps, those are tasty!

Pour the batter into the prepared pan. Bake about 60 minutes, but check it with a toothpick at 45. When the toothpick comes out clean, take it out of the oven. Cool in the pan for 5 minutes before transferring to a wire cooling rack.

Now, I like a slice of piping hot banana bread as much as the next girl but trust me when I say, once this baby is cool, put it in a ziplock bag and leave it alone overnight. In the morning, the sweetness of the bananas will have intensified and it will be about one million times better.

Tuesday, March 29, 2011

Mexican Roast Beef Tacos


Aside from having my mother, my grandparents didn't do a whole lot of things right. They illegally immigrated from Durango, Mexico sometime in the forties; and, I assume in the process of trying to survive, deal, and acclimate, quickly developed some horrible habits in the barrios of Los Angeles, California.

My grandpa was a towering man with giant forearms and the visage of a wooden Indian. He worked at a gas station and loved baseball but he really wasn't any good at either. I mostly remember him getting fired and never wanting to play catch with me. Really, it seemed like his true talents lied primarily in drinking and falling asleep in places that were not a bed or his house.

So every morning my grandma would half-mindedly call around looking for him. Somehow while dragging me around the kitchen on a blanket and re-frying the leftover roast beef, she managed to check with each one of his friends. And usually, by the time I was finishing the last bits of my breakfast, my grandpa would wander in, reeking of cheap beer and gas.

My grandparents would yell at each other in Spanish for a few minutes. Call each other drunks. And then mull about in silence, giving each other crusty looks until dinner time.

Clearly, my grandma was a woman of fortitude and resilience. But, as her purpose and identity in life was consumed with chasing after her borracho, I feel like her culinary genius went largely unrecognized and under-appreciated. Sure, she cooked with lard. And maybe she went a little heavy on the salt. So, while I'm not interested in that kind of dietary abuse, I am interested in honoring that incredible roast beef. And thankfully, Gilly and I figured out a delicious way to recapture it with just as much flavor and a lot less of the slow, impending death.

Now, if only I could trick someone into dragging me around on a blanket.

Mexican Roast Beef Tacos
  • 4-5 pound chuck roast
  • sea salt & black pepper
  • olive oil
  • 2 garlic cloves, smashed
  • 1 large onion, sliced
  • 1 (28 oz.) can crushed tomatoes
  • 2 cups beef broth
  • 1 tablespoon ancho chile powder
  • 1 tablespoon cayenne pepper
  • 1 tablespoon ground cumin
  • 3 bay leaves
  • corn tortillas
  • Guacamole

Season all sides of the beef with a good amount of salt and pepper. Don't be shy, you want the outside to be well coated. In a large Dutch oven, or other heavy pot with a tight cover, heat 2 tablespoons of olive oil over medium high heat. Add the beef to the pot and sear it on all sides, taking the time to build a nice golden crust all the way around. Add the onion and garlic and allow to soften and brown slightly, about 3 minutes. Add the crushed tomatoes, plus 1 tomato can of water, beef broth, and spices, adding more salt and pepper to taste. Add just enough water to cover the meat. Bring to a boil then reduce heat and simmer with a lid for 3 hours until the meat is fork tender. Let the meat cool in the liquid. Shred meat and set aside.

When you’ve made your guacamole and arranged your taco fixings, reheat the shredded beef in a cast iron skillet over medium high heat. This makes the meat slightly crispy on the outside and still juicy and delicious on the inside.

Monday, March 28, 2011

Green Spaghetti


I have two little sisters. One is in a junior in college, and one is in preschool. They both live in Colorado, they both have blonde hair, and they both gave their families a hard time when dinner was something other than macaroni and cheese. While my college-age sister has moved on to more interesting culinary exploits, we can all thank her childhood stubbornness for forcing our mother to invent green spaghetti. It's a pasta sauce made of bright, just-wilted spinach, Parmesan cheese, and garlic. Topped with say, a sliced chicken breast and some halved cherry tomatoes, this is a great weeknight meal and a healthy substitute to your favorite cheesy pasta.

Green Spaghetti
  • 6 cups baby spinach, washed and damp
  • 1 tablespoon butter
  • 4 cloves garlic, minced
  • 1/2 grated Parmesan cheese
  • splash milk
  • 1 tsp ground nutmeg
  • salt and pepper to taste
  • 1 pound whole wheat pasta of your choice

Cook pasta in boiling salted water until very al dente. While your pasta is cooking, put garlic, spinach and butter in large skillet and cook over medium heat until just wilted. Toss into your food processor (I use an immersion blender) with Parmesan and nutmeg. Add a conservative splash of milk and blend until smooth and creamy (If your ratio is off, you can add more milk to thin and cheese to thicken). Salt and pepper to taste. Pour sauce over hot pasta, sprinkle with Parmesan, top with tomatoes/chicken/addition of your choice and have at it.

Friday, March 25, 2011

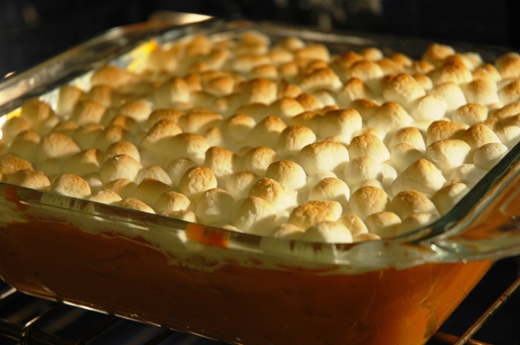
Southern Sweet Potato Casserole


It's raining in Southern California. And unlike transplants from other parts of the country, I'm not complaining. We have seasons here, people. And I like them. So in honor of the gloriously cozy weekend I am about to spend staring out at the stormy San Gabriels, I'm making comfort food.

The worst thing about this sweet potato casserole is that everyone thinks they already know what it's going to taste like. You might be thinking "I don't like sweet potatoes like that," and remembering something your Aunt Susan brings to Thanksgiving that's syrupy and overly sweet. And while it's true that this recipe comes directly from my grandmother's holiday traditions in South Carolina, I'm not exaggerating when I say this will change your mind.

It's a casserole. And beside some roast chicken and vegetables, it totally works as a side. But it's also kind of like pudding, and I like it best in a bowl. For breakfast. Or dessert.

Southern Sweet Potato Casserole
  • 6-8 sweet potatoes (or garnet yams*)
  • 1 stick unsalted butter, melted
  • 1 can orange juice concentrate, slightly defrosted
  • package mini marshmallows

Preheat oven to 350 degrees. Line a sheet pan with foil or parchment paper. Poke a few holes in your potatoes with a fork, place on baking sheet and cook until very tender and oozing slightly, about 2 hours.

When the potatoes have cooled enough to be handled, scoop out the insides and blend with your machine of choice (I like to use an immersion blender, but a food processor of any kind will do). Add butter and orange juice and blend until very smooth, light, and almost fluffy.

Pour into baking dish and reheat in oven (still at 350 degrees) for about 30 minutes, until warmed through.

Cover the top with marshmallows and place dish under broiler for about 10 seconds. Keep your eyes on them the whole time, rotating if needed until tops of marshmallows are just browned.


*There seems to be a lot of confusion for people about what a sweet potato actually is. Basically, there's a white kind and an orange kind. We want the orange ones. US grocery stores tend to label the orange variety "yams" to help you differentiate. Read more here.

Wednesday, March 23, 2011

Linzer Sablés


This looks like a Christmas cookie. Especially if you're Swiss or German. Thankfully I'm American and I can do what I want, however culinarily insensitive, so let's make Christmas cookies in March.

These are actually really easy to make provided you have a cookie cutter. Somehow I managed to make it to my mid-twenties only owning ONE gingerbread man-shaped cutter. So further disrespecting our position on the calendar, I attempted to make a few Linzer Sablemen. These were not a success. This cookie's delicate and crumbly texture does not want to have arms and legs. It wants to be circular. So I relented and used to an upturned egg-cup as a makeshift cutter and voila, Lenten Linzer Sables were born.

Linzer Sables
  • 1 1/2 cups almond meal
  • 1 1/2 cups whole wheat flour
  • 1 1/2 teaspoons ground cinnamon
  • 1/4 teaspoon salt
  • 1/4 teaspoon ground cloves
  • 1 egg
  • 2 teaspoons water
  • 1 stick unsalted butter, at room temperature
  • 1/2 cup sugar
  • 1/2 cup raspberry jam plus 1 teaspoon water

Put the first 5 dry ingredients in a bowl, whisk together. In another small bowl, stir the egg and water together using a fork.

In a large bowl, beat the butter and sugar together until smooth, about 5 minutes.. Add the egg mixture and beat for about another minute until well combined. Add the dry ingredients slowly, mixing only until they disappear into the dough. Don’t work the dough too much once the flour is incorporated.

Divide the dough in half. Working with one half at a time, put the dough between two large sheets of plastic wrap. Using your hands, flatten the dough into a disk, then use a rolling pin to roll out the dough, turning it over frequently until it is about 1/4-inch thick. Leave the dough in the plastic and repeat with the second piece of dough. Transfer the wrapped dough to a baking sheet or cutting board (to keep it flat) and refrigerate or freeze it until it is very firm, about 2 hours in the refrigerator or 45 minutes in the freezer.

Center a rack in the oven and preheat the oven to 375° F. Line two baking sheets with parchment or silicone mats.

Peel off the top sheet of plastic from one piece of dough and, using a 2-inch round cookie cutter—or...whatever you have—cut out as many cookies as you can. If you want to have a peekaboo cutout, you can use the end of a piping tip to cut out a very small circle from the centers of half the cookies. Transfer to the baking sheets, leaving a little space between the cookies. Set the scraps aside—you can combine them with the scraps of the second disk and roll out and chill again before you cut more cookies.

Bake the cookies one sheet at a time for 11 to 13 minutes, or until the cookies are lightly golden, dry, and just firm to the touch. Transfer the cookies to a rack to cool to room temperature.

Place the jam in a small saucepan or in a microwaveable bowl and stir in the 1 teaspoon water. Bring to a boil over low heat or in the microwave. Let the jam cool slightly, then turn half of the cookies flat side up and place about 1/2 teaspoon jam in the center of each cookie; sandwich with the remaining cookies. Finish off with a dusting of powdered sugar.